A change in direction

I’ve decided that my focus on hand tools only hasn’t really fit with what I want out of woodworking as a hobby. So I’ve taken a new direction, towards “hybrid woodworking”. I signed up for The Wood Whisperer Guild, and I’ve listed many of my hand tools I don’t need on ebay, as well as some books and DVDs.

My goal is to save up for a SawStop. I hope to build the upcoming guild project for a dresser and nigh stand, as well as the Dogon platform bed.

Youngblood Lumber

Today I attended my first meeting for the MNWG, which was hosted by Youngblood Lumber. The place has been in business for over 100 years, and Jim who was giving the tour and demo of the mill, has been there for over 40 years.

An interesting tour, and I’ll definitely be heading there for hardwoods for a future project.

I was also surprised to find their Oliver planer had a helical head on it. It was also 97 hp! Love the sign taped onto it.

20140726-122640-44800117.jpg

20140726-122639-44799527.jpg

Finally, a German hatchet!

Ever since Lost Art Press published Make a Joint Stool from a Tree, I’ve wanted a German hatchet like Peter Follansbee uses. Well they seem to be impossible to find, but at today’s meet, I finally found one. It has the right weight and length to it, and the blade is thinner than a normal hatchet, and of course single bevel for hewing. The back of the handle at the head is also square, which feels right for finer work. The branding is marked Ochsenkopf. Looks like the company is still making tools, but I’m not aware if they have any US distributors.

20140208-141244.jpg

20140208-141252.jpg

20140209-091159.jpg

M-WTCA 2014

Today I made my annual pilgrimage (about 3 miles away from my house) to my local area meet for the Mid-West Tool Collector’s Association. This year was even more packed than last year. I picked up a German hatchet, an Adze and a large Witherby chisel. I heard the voice of Mike Siemsen talking, and when I looked up I saw Christopher Schwarz filming Mike! I found out later from Mike that they were doing a video on getting tools to start out. I introduced myself, and only noticed later that the other half of Lost Art Press was also standing there. Sorry John! I am a huge fan of their work, and it was a cool surprise!

The photo below shows Chris asking Mike about saws. I overheard this exchange.

Chris (while filming): “So how many saws do you need?”

Mike: “As many as you can get.”

To which the response was laughter and something like “now don’t tell them that!”. It looked like they were having fun, and Mike continued to fill his 5-gallon home center bucket with bargain tools. I’m sure the video will be good stuff.

20140208-120310.jpg

Screwdrivers

After reading all the posts by Chris Schwarz on screwdrivers, I started looking closer into picking up some that have hollow-ground tips. I currently own the wooden handled set from Felo. Great handles, but the tips are the standard tapered style.

I checked out the elemen’tary driver that Chris mentioned. It looks very nice, but expensive when you start buying bits from Brownells on top of it. But I like the idea of interchangeable bits, it takes up less space than another set in the tool chest.

I came across MegaPro screwdrivers, which are made in the USA, and come in many configurations in general or trade-specific varieties. The slotted bits in these drivers are hollow-ground like the Brownells. Looking at the product images on their site will show you what bits each come with. The general models come with odd bits like Robertson and hex bits. I don’t use square drive, and I prefer Allen style wrenches for hex. Then I found a model intended for HVAC that actually looks decent for woodworking. I ordered one, and just received it.

The HVAC model has a plastic (ABS) handle which stores the bits inside, and thus is on the larger side. For me it fits and feels great. The bits included are #0-3 Phillips, including extras of the common #2. For hollow-ground slotted bits you’ve got 3, 4, 5, 5.5 and 6. You’ve also got a square awl which is unique, basically a birdcage awl bit. The only trade specific bit is the valve stem bit. But otherwise you’ve got a made in USA product that can store the bits inside the tool itself and looks to be very well made at a good price.

M-WTCA Area Meet

This past Saturday was the Cabin Fever meet near my house again. I was highly anticipating this, as I loved going last year. I showed up early, and wow, the turnout was twice the number from last year! I was overwhelmed at the number of tables stuffed with tools.

I had a few things I knew I wanted to find, and I did well on some of them. I picked up a 12″ Starrett Combination Square from the same guy I bought the Bridge City from last year. I also finally found a decent single bevel axe, a True Temper Flint Edge. And I finally have my own Fray brace. But my favorite find happened much like last year. Show was getting close to over, I’m digging through some crates on the floor, and then I pick up this thick set of dividers, which felt like they must weigh over a pound. Wow.

I had $9 left in cash, so I offered it to the guy and they were mine. I don’t think they are blacksmith made, but they are definitely alot heavier duty than any I’ve seen. They are solid, and I love the chamfers and almost architectural details.

I can only attribute this lucky find with wearing my new Lost Art Press hat.

Image

Changing focus for the new year

It’s 2013, and I’ve received renewal notices for organizations and publications I subscribe to. I received Popular Woodworking and Fine Woodworking last year, first time for both. I’m not renewing either one. Why? Because neither actually helped me do any woodworking.

I haven’t posted much on here since last June, which is the same month my daughter was born. Two kids, two parents with demanding, full-time jobs has been difficult, and most of the time I don’t get time in the shop. So I tend to read alot. I can read blogs on my phone while on the bus, or in the middle of the night feeding my daughter. One such blog post struck home, from chairmaker Jeff Miller.

Jeff posted in early December about improving skills and the roadblocks that can get in the way. The second item on the list was surprising to see, “Stop reading quite so much (or watching so many videos) and start making stuff.”

This hit home for me, as that’s all I’ve done this past year. That and acquire tools. So when those magazine renewals came, I ripped them up before I could second guess myself. Instead I’ve decided to subscribe to another publication, Fine Tool Journal. This publication is focused on hand tools, and is only 4 issues a year. I’ve also decided to drop membership with EAIA, as I didn’t see much benefit from it in 2012.

I still continue to buy books, including many from Lost Art Press. And hopefully I find a way to make time for more actual woodworking in 2013.

Sharpening saws by hand

Today I attended Mike Siemsen’s School of Woodworking for a class on sharpening Hand Saws. I brought two Disston D-23 crosscut saws with me, one in 8pt and another in 10pt. I learned a ton today, and it was fun to learn alongside others experiencing the same thing for the first time. Funny, one guy mentioned his job was being “a computer guy”, and at least 5 others, including me, said the same. Must be an attraction to hand tool woodworking for those immersed in technology on a daily basis. I really enjoyed the class, and hope to attend more of Mike’s classes in the future. He’s a good guy to learn from, and a real nice guy.

As for my saws, I started with my 8pt, and did an OK job on it. I put too much set on it, not knowing how to adjust my saw set. I learned from my mistakes on my 10pt, and I really like how that one turned out. Very sweet to cut with.

There was something really cool about learning to do something my Grandfather was interested in late in life. The saws, vise and files I have are all from him, and the 10pt saw was his too. Hopefully these skills last me a lifetime, and I can pass them on to my grandkids.

Lie-Nielsen Hand Tool Event

This weekend I attended my first Lie-Nielsen Hand Tool Event. They had all their tool displays out along with books, DVDs, workbenches. You name it. Also in attendance was Glen-Drake Toolworks and Mike Siemsen’s School of Wood.

I got a closer look and probably picked up almost every hand plane Lie-Nielsen had there. First impression, is wow, the weight of their bench planes is impressive. I noticed the frogs are made of brass, I didn’t notice that before. These are no lightweight tools, and I know if a vintage Stanley plane can last over a century, these tools will last forever. Second impression, how did anyone ever use a #1 bench plane? Tiny!

My favorite tool was their low-angle block plane with an adjustable mouth. While watching the companion DVD for The Anarchist’s Tool Chest, Christopher Schwarz describes the Lie-Nielsen #60 1/2 block plane as fitting his hand perfectly, and I will agree with that. It is a beautiful tool to behold. It feels like an extension of your hand.

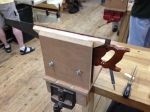
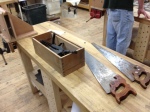
After I got done ogling tools and lurking around some demo benches, I made my way over to Mike Siemsen’s bench. I watched him cut some miters in his Moxon vise, and I asked him a few questions about his bench he had. He blogged about the making of his Nicholson-style bench in 2008, and he was one of the first that I know of to utilize a split-top, which is now seen in Benchcrafted’s Split Top Roubo bench.

I asked him how he made the wooden screw in his end vise… his explanation was that it involved machinery that most people don’t have, so its really out of reach of people looking to make that bench. But it opened up conversation, and he told me if he built it again, he wouldn’t even include a vise.

Wait, what? No vise?

I was told that using the crochet (the hook seen on the side of the bench pictured in the masthead of this site) and holdfasts in the holes on the aprons of the bench was faster than using the end vise. For dovetailing and other vice work, use a Moxon vise (which sits atop the bench).

I thought, what about tall boards in that Moxon, like dovetailing the end of a long board? Would you hang half the vise off the end of the bench? Well that’s where the split-top comes in. The board can drop in through the split. Brilliant.

So with Mike Siemsen’s bench, you have a Nicholson-style bench that is cheaper to make, faster to use and can be made easily using hand tools. Sounds like a winner to me!

I didn’t come away from the show with any tools, but I did buy a Lie-Nielsen hat and a chunk of beeswax for the soles of my handplanes. It was a fun event, and I’ll definitely have to take a class from Mike someday.

Restoring junk

Yesterday I spent a day in the shop doing maintenence. I finally ground and honed the blade in my Keen Kutter KK7 jointer plane. I even filed down the frog, which I dove right into. It all could’ve went horribly wrong, but it didn’t. Everything went great and the plane works great.

I also gave my first shot at electrolysis for rust removal. I read some guides, and watched some videos on it, and decided to give it a shot. I had an old cast iron pan that had some cracks in it. This was my sacrificial anode. I picked up a large box of baking soda (here’s a tip, just get the small box). And I borrowed my dad’s old Sears battery charger.

I filled up an old round plastic tub with water, and added 1 Tbsp of baking soda per gallon. Make sure the top of your anode is above the water line, and hook up your positive lead to the part above the water. Then hook up the negative lead to the part to be derusted and submerge it next to the anode, leaving at least 2 inches of space between. Plug it in and wait a few hours.

You’ll need some Scotch Brite or a stiff nylon brush and some soap and water to clean up the black oxide left behind. I plan to pickup some Scotch Brite grinder wheels, along with some lapping/polishing wheels too. This will speed up this sort of restore considerably and yield better results.

As for the rest of the plane parts, I dunked them in a bath of EvapoRust. I had bought this to try on some saw blades, but it didn’t quite do the job I wanted it to. But for these plane parts it was perfect. Whats nice is that it gets inside the screw holes and does a thorough job.

I also threw in a pair of dividers (or maybe this is considered a caliper, I’m not sure) that Eric Mattson gave me for free at the M-WTCA Cabin Fever meet a few weeks ago. It was coated in orange rust, and you couldn’t even see a maker’s mark on it. He told me they were Starrett, but you can barely make out “Pexto”. When I picked them up to check them out, he told me “You can have it, as long as I don’t have to clean it”. Well yesterday I dunked them in with the rest of the plane parts.

Here’s a pic of the result. Didn’t know it had brass parts! Looks pretty neat, the contrast of pitted metal with shiny brass. The points are sharp, and it locks up tight, so this will definitely be put to use. Which is what a tool is meant for in the first place.